# Playing with Infinit & Docker
> Learn how to integrate Infinit and Docker on Ubuntu & macOS. Explore concepts, setup, and usage for enhanced storage solutions. Acquisition by Docker boosts promise.
- Canonical: https://www.russ.cloud/2016/12/27/playing-with-infinit-docker/
- Published: 2016-12-27
- Author: Russ McKendrick
- Tags: Docker, Tools
---
At the start of this month [Docker purchased a storage startup called Infinit](http://blog.infinit.sh/infinit-joins-docker/).
https://x.com/russmckendrick/status/806153366573318145
Up until then I had only heard of their commercial offering which can be found at [https://infinit.io/](https://infinit.io/) which on the face of it has nothing to do with container storage and is a Dropbox equivalent.
### Concepts
Before we roll our sleeves up and install, configure & user Infinit we need to cover a few of the terms.
We are going to be …
- Creating a User
- Creating some Storage
- Creating a Network
- Creating a Volume
… a user sounds straight forward enough, but what are the rest? Before we look at each one in turn we need to discuss the Hub.
#### The Hub
The Hub is described by Infinit as;
> All objects (users, storages, networks, volumes etc.) are created locally by default with no server involved. The creation process may generate one or more files and store them in the `$INFINIT_HOME` directory, more specifically in the subdirectory `$INFINIT_DATA_HOME`.
> The command-line tools however provide a way to rely on the Hub for certain operations in order to simplify some administrative tasks such as inviting a user to a drive, sharing the volumes created within a network, moving the user identity to another of your devices and so on. In addition, some functionalities such as the consumption of storage capacity in a network are only available through the Hub. As a rule of thumb, we advise you to always rely on the Hub, unless you know exactly what you are doing.
For this test we will be using the Hub, although it is possible to manually transfer states between instances.
#### Users
A **User** is exactly what you think it is, a **User** which has access to the The Hub.
#### Storage
There are three types of **Storage** you can create;
- Local stores files on the instances local filesystem
- Amazon S3 uses Amazons object store to save our files to
- Google Cloud Storage uses Googles object store to the save the files
We are going to be looking at Local storage in our test.
#### Network
This is where all of the clever stuff happens, an overlay **Network** basically takes care of distributing the and managing the blocks which go to make our files, or to put it more traditional terms its the distributed storage layer.
The Infinit documentation goes into the following detail on the three different types of overlay networks which are are currently available;
> **Kalimero**: Simple test overlay supporting only one node.
> **Kelips**: Overlay with support for node churn. The k argument specifies the number of groups to use, each group being responsible for 1/kth of the files. See the reference paper [“Kelips: Building an Efficient and Stable P2P DHT through Increased Memory and Background Overhead”](http://iptps03.cs.berkeley.edu/final-papers/kelips.pdf) for more information.
> **Kouncil**: Fully connected overlay that stores the whole block address book in memory, and broadcast updates to all nodes when a new block is created.
Networks can have users attached to them as well as Access Control Lists (ACL) meaning that you can share content between many users and decide if they have either Read or Read/Write access to the blocks.
#### Volume
A volume sits on top of the overlay network and means that you can present the distributed storage as a logical drive allowing your instance and applications to read and write to it.
### Installing Infinit
I am running two Ubuntu 16.06 instances for this test, as I am using [Digital Ocean](https://m.do.co/c/52ec4dc3647e) I am connecting as the `root` user, if you aren’t already `root` then run the following commands to switch to `root` and apply any upgrades;
```bash frame="terminal" title="Playing with Infinit & Docker 1/37"
sudo su -
apt-get update -y
apt-get upgrade -y
```
Now that we have an up-to-date system lets install Infinit, Although the instructions below look like they are for Ubuntu 14.04 they work fine with Ubuntu 16.04;
```bash frame="terminal" title="Playing with Infinit & Docker 2/37"
apt-get install -y fuse
apt-key adv --keyserver keyserver.ubuntu.com --recv-keys 3D2C3B0B
add-apt-repository "deb https://debian.infinit.sh/ trusty main"
apt-get update -y
apt-get install -y infinit
```
As all we have done is install binaries to `/opt/infinit` we need to make that is in our execution path, to do this run the following;
```bash frame="terminal" title="Playing with Infinit & Docker 3/37"
cd /opt/infinit
export PATH=$PWD/bin/:$PATH
```
Once you have run the commands above on both Ubuntu 16.04 instances we can start to play with Infinit.
### Using Infinit
To start with we are just going to be using one of our two Ubuntu 16.04 instances, we will then be sharing the contents with our second instance.
#### Instance #1
Lets start by creating a user, to do this run the following command replacing my name with your name;
```bash frame="terminal" title="Playing with Infinit & Docker 4/37"
infinit-user --signup --name russ --fullname "Russ McKendrick"
```
Now we have a user created, we can create a local filesystem;
```bash frame="terminal" title="Playing with Infinit & Docker 5/37"
infinit-storage --create --filesystem --name local --capacity 1GB
```
and then a network;
```bash frame="terminal" title="Playing with Infinit & Docker 6/37"
infinit-network --create --as russ --storage local --name blogpost --push
```
and finally a volume;
```bash frame="terminal" title="Playing with Infinit & Docker 7/37"
infinit-volume --create --as russ --network blogpost --name my-volume --push
```
Now that we have a volume we can mount it by running the following command;
```bash frame="terminal" title="Playing with Infinit & Docker 8/37"
infinit-volume --mount --as russ --name my-volume --mountpoint ~/mnt --allow-root-creation --cache --publish --daemon
```
Running the following should show you your mounted volume and create some files;
```bash frame="terminal" title="Playing with Infinit & Docker 9/37"
df -h
cd ~/mnt
touch wibble
echo "working" > rah
```
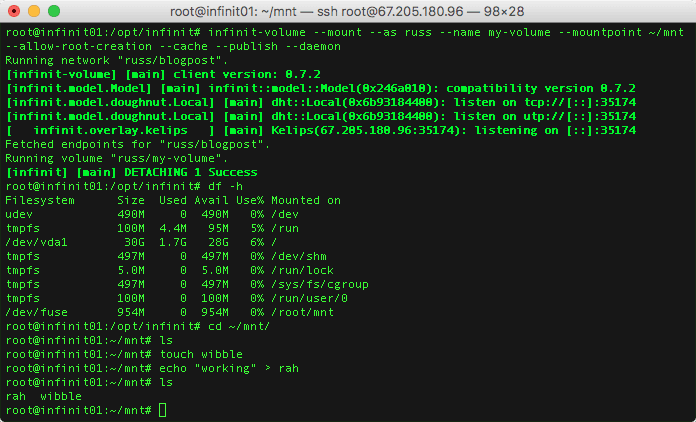 Now we have a user, some storage, a network and a volume we can look at mounting the volume on our second instance, before we move though we need to run the following command which will make allow us to down the credentials for the user we created.
When you run it you will be asked for a passphrase and then will be shown a counter, once the counter expires you will have to re-run the command;
```bash frame="terminal" title="Playing with Infinit & Docker 10/37"
infinit-device --transmit --user --as russ
```
Now we have a user, some storage, a network and a volume we can look at mounting the volume on our second instance, before we move though we need to run the following command which will make allow us to down the credentials for the user we created.
When you run it you will be asked for a passphrase and then will be shown a counter, once the counter expires you will have to re-run the command;
```bash frame="terminal" title="Playing with Infinit & Docker 10/37"
infinit-device --transmit --user --as russ
```
 #### Instance #2
To receive our user credentials we need to run the following command;
```bash frame="terminal" title="Playing with Infinit & Docker 11/37"
infinit-device --receive --user --name russ
```
You will be asked for the passphrase you set on **Instance #1** entered you should see something like the following;
#### Instance #2
To receive our user credentials we need to run the following command;
```bash frame="terminal" title="Playing with Infinit & Docker 11/37"
infinit-device --receive --user --name russ
```
You will be asked for the passphrase you set on **Instance #1** entered you should see something like the following;
 and on **Instance #1** you should have confirmation that the credentials have been transmitted;
 Now we have our user on our second instance we can fetch the network we created on our first instance by running;
```bash frame="terminal" title="Playing with Infinit & Docker 12/37"
infinit-network --fetch --as russ --name blogpost
```
and then the volume we created;
```bash frame="terminal" title="Playing with Infinit & Docker 13/37"
infinit-volume --fetch --as russ --name my-volume
```
and then we need to link our instance to the network by running;
```bash frame="terminal" title="Playing with Infinit & Docker 14/37"
infinit-network --link --as russ --name blogpost
```
Now that our instance has joined the network we can mount the volume by running the following as we did on our first instance;
```bash frame="terminal" title="Playing with Infinit & Docker 15/37"
infinit-volume --mount --as russ --name my-volume --mountpoint ~/mnt --allow-root-creation --cache --publish --daemon
```
Now we have the volume mounted lets check the contents;
```bash frame="terminal" title="Playing with Infinit & Docker 16/37"
ls -lhat ~/mnt/
cat ~/mnt/rah
```
You should see that the files `wibble` and `rah` are present, and that `rah` contains the word **Working**, lets add some content to `wibble` by running;
```bash frame="terminal" title="Playing with Infinit & Docker 17/37"
echo "still working" >> ~/mnt/wibble
```
Now we have our user on our second instance we can fetch the network we created on our first instance by running;
```bash frame="terminal" title="Playing with Infinit & Docker 12/37"
infinit-network --fetch --as russ --name blogpost
```
and then the volume we created;
```bash frame="terminal" title="Playing with Infinit & Docker 13/37"
infinit-volume --fetch --as russ --name my-volume
```
and then we need to link our instance to the network by running;
```bash frame="terminal" title="Playing with Infinit & Docker 14/37"
infinit-network --link --as russ --name blogpost
```
Now that our instance has joined the network we can mount the volume by running the following as we did on our first instance;
```bash frame="terminal" title="Playing with Infinit & Docker 15/37"
infinit-volume --mount --as russ --name my-volume --mountpoint ~/mnt --allow-root-creation --cache --publish --daemon
```
Now we have the volume mounted lets check the contents;
```bash frame="terminal" title="Playing with Infinit & Docker 16/37"
ls -lhat ~/mnt/
cat ~/mnt/rah
```
You should see that the files `wibble` and `rah` are present, and that `rah` contains the word **Working**, lets add some content to `wibble` by running;
```bash frame="terminal" title="Playing with Infinit & Docker 17/37"
echo "still working" >> ~/mnt/wibble
```
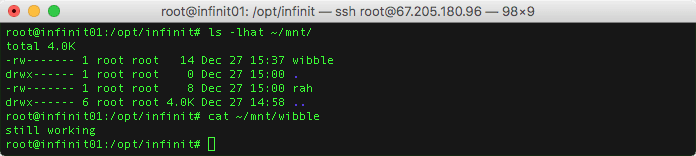
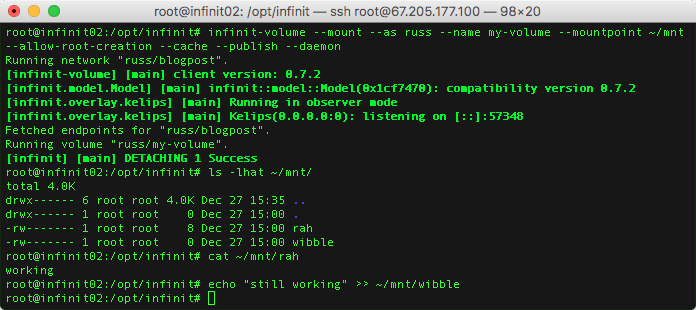 We still have our volume mounted on our first instance, lets go back there and check out the contents of `~/mnt` by running;
```bash frame="terminal" title="Playing with Infinit & Docker 18/37"
ls -lhat ~/mnt
cat ~/mnt/wibble
```
As you should, the changes we made on our second instance have been immediately copied over and are available on our first instance.
We still have our volume mounted on our first instance, lets go back there and check out the contents of `~/mnt` by running;
```bash frame="terminal" title="Playing with Infinit & Docker 18/37"
ls -lhat ~/mnt
cat ~/mnt/wibble
```
As you should, the changes we made on our second instance have been immediately copied over and are available on our first instance.
 #### Exporting our user
If like me, you have probably launched a few instances are going to be destroying them as soon as you have finished playing with Infinit, to make sure we have access to our users credentials we can export the keys used by running the following;
```bash frame="terminal" title="Playing with Infinit & Docker 19/37"
infinit-user --export --full --name russ --output russ.user
```
#### Exporting our user
If like me, you have probably launched a few instances are going to be destroying them as soon as you have finished playing with Infinit, to make sure we have access to our users credentials we can export the keys used by running the following;
```bash frame="terminal" title="Playing with Infinit & Docker 19/37"
infinit-user --export --full --name russ --output russ.user
```
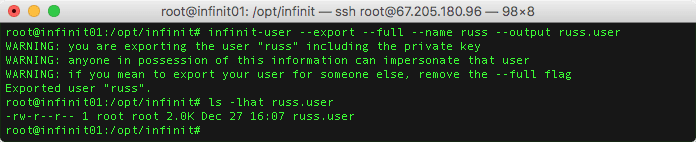 As per the output, it is important you keep the file safe, it is the equivalent of the private and public portions of an SSH key.
#### Locally
As the volumes are mounted using FUSE;
> [**Filesystem in Userspace** (**FUSE**)](https://en.wikipedia.org/wiki/Filesystem_in_Userspace) is a [software interface](https://en.wikipedia.org/wiki/Software_interface "Software interface") for [Unix-like](https://en.wikipedia.org/wiki/Unix-like "Unix-like") computer [operating systems](https://en.wikipedia.org/wiki/Operating_system "Operating system") that lets non-privileged users create their own [file systems](https://en.wikipedia.org/wiki/File_system "File system") without editing [kernel](https://en.wikipedia.org/wiki/Kernel_%28computing%29 "Kernel (computing)") code. This is achieved by running file system code in [user space](https://en.wikipedia.org/wiki/User_space "User space") while the FUSE module provides only a “bridge” to the actual kernel interfaces.
You can also run Infinit on local machines running both macOS and Windows. As I have a Mac lets look at installing everything we need using [Homebrew](http://brew.sh/) & [Cask](https://media-glass.es/cask-7ae6de06b3d4).
First of all we need to install [FUSE for macOS](https://osxfuse.github.io/) by running;
```bash frame="terminal" title="Playing with Infinit & Docker 20/37"
brew cask install osxfuse
```
Once installed, reboot your machine. When your machine is back up and running you can run the following `brew` command to install Infinit;
```bash frame="terminal" title="Playing with Infinit & Docker 21/37"
brew install infinit/releases/infinit
```
Now that Infinit is installed, goto one of the instances and run the following command;
```bash frame="terminal" title="Playing with Infinit & Docker 22/37"
infinit-device --transmit --user --as russ
```
and then on your macOS machine run;
```bash frame="terminal" title="Playing with Infinit & Docker 23/37"
infinit-device --receive --user --name russ
```
Now the key is installed we can join the overlay network by running;
```bash frame="terminal" title="Playing with Infinit & Docker 24/37"
infinit-network --fetch --as russ --name blogpost
infinit-volume --fetch --as russ --name my-volume
infinit-network --link --as russ --name blogpost
```
and then to mount it run the following;
```bash frame="terminal" title="Playing with Infinit & Docker 25/37"
infinit-volume --mount --as russ --name my-volume --mountpoint ~/mnt --allow-root-creation --cache --publish
```
Note, that I am not adding `--daemon` to the command this time, if you do you might get a timeout error.
Opening another terminal and running;
```bash frame="terminal" title="Playing with Infinit & Docker 26/37"
cd ~/mnt/
ls -lhat
open .
```
Should show you the content of the mount, and open it in the finder;
As per the output, it is important you keep the file safe, it is the equivalent of the private and public portions of an SSH key.
#### Locally
As the volumes are mounted using FUSE;
> [**Filesystem in Userspace** (**FUSE**)](https://en.wikipedia.org/wiki/Filesystem_in_Userspace) is a [software interface](https://en.wikipedia.org/wiki/Software_interface "Software interface") for [Unix-like](https://en.wikipedia.org/wiki/Unix-like "Unix-like") computer [operating systems](https://en.wikipedia.org/wiki/Operating_system "Operating system") that lets non-privileged users create their own [file systems](https://en.wikipedia.org/wiki/File_system "File system") without editing [kernel](https://en.wikipedia.org/wiki/Kernel_%28computing%29 "Kernel (computing)") code. This is achieved by running file system code in [user space](https://en.wikipedia.org/wiki/User_space "User space") while the FUSE module provides only a “bridge” to the actual kernel interfaces.
You can also run Infinit on local machines running both macOS and Windows. As I have a Mac lets look at installing everything we need using [Homebrew](http://brew.sh/) & [Cask](https://media-glass.es/cask-7ae6de06b3d4).
First of all we need to install [FUSE for macOS](https://osxfuse.github.io/) by running;
```bash frame="terminal" title="Playing with Infinit & Docker 20/37"
brew cask install osxfuse
```
Once installed, reboot your machine. When your machine is back up and running you can run the following `brew` command to install Infinit;
```bash frame="terminal" title="Playing with Infinit & Docker 21/37"
brew install infinit/releases/infinit
```
Now that Infinit is installed, goto one of the instances and run the following command;
```bash frame="terminal" title="Playing with Infinit & Docker 22/37"
infinit-device --transmit --user --as russ
```
and then on your macOS machine run;
```bash frame="terminal" title="Playing with Infinit & Docker 23/37"
infinit-device --receive --user --name russ
```
Now the key is installed we can join the overlay network by running;
```bash frame="terminal" title="Playing with Infinit & Docker 24/37"
infinit-network --fetch --as russ --name blogpost
infinit-volume --fetch --as russ --name my-volume
infinit-network --link --as russ --name blogpost
```
and then to mount it run the following;
```bash frame="terminal" title="Playing with Infinit & Docker 25/37"
infinit-volume --mount --as russ --name my-volume --mountpoint ~/mnt --allow-root-creation --cache --publish
```
Note, that I am not adding `--daemon` to the command this time, if you do you might get a timeout error.
Opening another terminal and running;
```bash frame="terminal" title="Playing with Infinit & Docker 26/37"
cd ~/mnt/
ls -lhat
open .
```
Should show you the content of the mount, and open it in the finder;
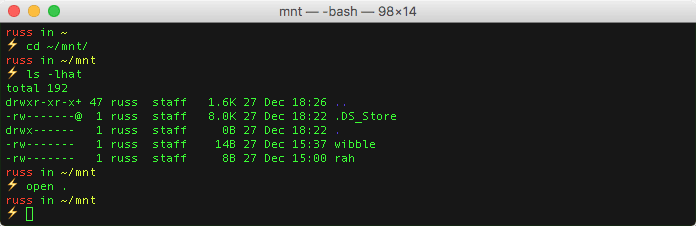 and the finder;
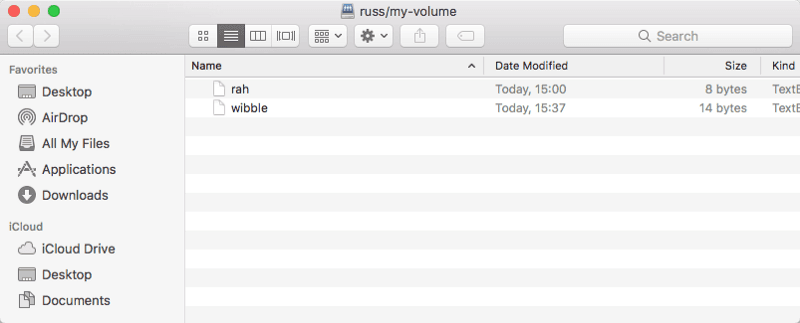 Which means you can simply drop a file in the finder;
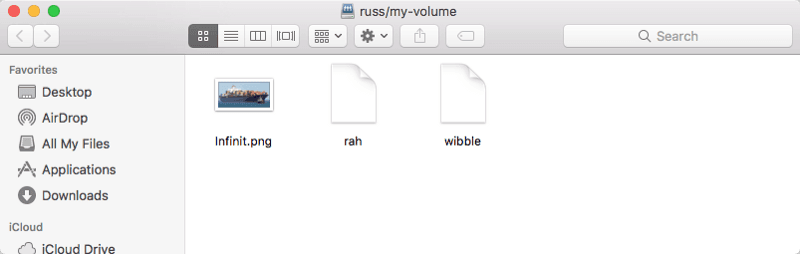 To make it available to all instances in the overlay network;
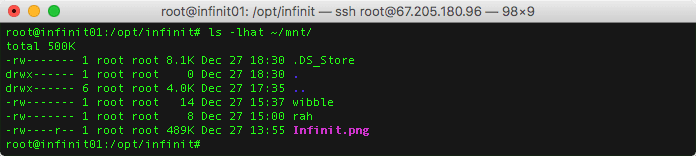
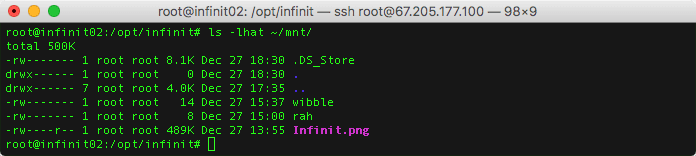 To unmount the volume press `ctrl + c` to terminate the process.
You maybe thinking yourself, thats great but what about Docker? They brought the company, there is a picture of some shipping containers as a featured image at the top of this post so we must surely be getting to Docker.
Before we look how to hook Infinit into Docker we should unmount the volumes on our two instances, to do this run;
```bash frame="terminal" title="Playing with Infinit & Docker 27/37"
killall infinit-volume
```
### Docker Plugin
Before we look at the Infinit Docker plugin we need to install Docker, to do this simply run the following commands on both instances to download and install the latest version of Docker;
```bash frame="terminal" title="Playing with Infinit & Docker 28/37"
curl -sSL https://get.docker.com/ | sh
```
Now that Docker is installed, check it has started by running;
```bash frame="terminal" title="Playing with Infinit & Docker 29/37"
docker ps
```
Finally, we have to allow non root users access to FUSE, to do this simply run;
```bash frame="terminal" title="Playing with Infinit & Docker 30/37"
echo "user_allow_other" >> /etc/fuse.conf
```
On both instances and thats all of the preparation done. To install and configure the Docker plugin simply run the following command;
```bash frame="terminal" title="Playing with Infinit & Docker 31/37"
infinit-daemon --start --as russ --docker-user root
```
I have used the use `root` as that is the default user for the Digital Ocean instances I launched, and thats kind of it, the Docker plugin should now be installed and configured. To check simply run;
```bash frame="terminal" title="Playing with Infinit & Docker 32/37"
docker volume list
```
To unmount the volume press `ctrl + c` to terminate the process.
You maybe thinking yourself, thats great but what about Docker? They brought the company, there is a picture of some shipping containers as a featured image at the top of this post so we must surely be getting to Docker.
Before we look how to hook Infinit into Docker we should unmount the volumes on our two instances, to do this run;
```bash frame="terminal" title="Playing with Infinit & Docker 27/37"
killall infinit-volume
```
### Docker Plugin
Before we look at the Infinit Docker plugin we need to install Docker, to do this simply run the following commands on both instances to download and install the latest version of Docker;
```bash frame="terminal" title="Playing with Infinit & Docker 28/37"
curl -sSL https://get.docker.com/ | sh
```
Now that Docker is installed, check it has started by running;
```bash frame="terminal" title="Playing with Infinit & Docker 29/37"
docker ps
```
Finally, we have to allow non root users access to FUSE, to do this simply run;
```bash frame="terminal" title="Playing with Infinit & Docker 30/37"
echo "user_allow_other" >> /etc/fuse.conf
```
On both instances and thats all of the preparation done. To install and configure the Docker plugin simply run the following command;
```bash frame="terminal" title="Playing with Infinit & Docker 31/37"
infinit-daemon --start --as russ --docker-user root
```
I have used the use `root` as that is the default user for the Digital Ocean instances I launched, and thats kind of it, the Docker plugin should now be installed and configured. To check simply run;
```bash frame="terminal" title="Playing with Infinit & Docker 32/37"
docker volume list
```
 Now that our volume is available we can attach it to a container by running;
```bash frame="terminal" title="Playing with Infinit & Docker 33/37"
docker run -it --rm --volume-driver infinit -v russ/my-volume:/mnt alpine ash
```
That should mount our volume to `/mnt` within the container. Once in run the following commands;
```bash frame="terminal" title="Playing with Infinit & Docker 34/37"
ls -lhat /mnt
echo "FROM DOCKER" >> /mnt/docker
exit
```
Now that our volume is available we can attach it to a container by running;
```bash frame="terminal" title="Playing with Infinit & Docker 33/37"
docker run -it --rm --volume-driver infinit -v russ/my-volume:/mnt alpine ash
```
That should mount our volume to `/mnt` within the container. Once in run the following commands;
```bash frame="terminal" title="Playing with Infinit & Docker 34/37"
ls -lhat /mnt
echo "FROM DOCKER" >> /mnt/docker
exit
```
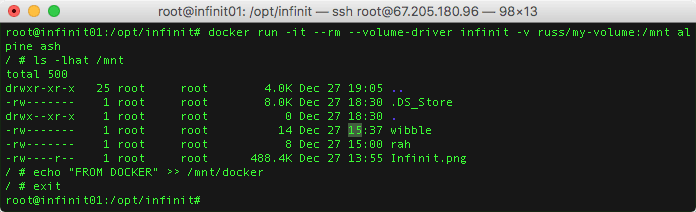 Typing `exit` will stop and remove the container, you can check that the container has been removed by running;
```bash frame="terminal" title="Playing with Infinit & Docker 35/37"
docker ps -a
```
To launch a new container simply run the same command as before;
```bash frame="terminal" title="Playing with Infinit & Docker 36/37"
docker run -it --rm --volume-driver infinit -v russ/my-volume:/mnt alpine ash
```
and check the contents of `/mnt` by running;
```bash frame="terminal" title="Playing with Infinit & Docker 37/37"
ls -lhat /mnt
cat /mnt/docker
exit
```
Typing `exit` will stop and remove the container, you can check that the container has been removed by running;
```bash frame="terminal" title="Playing with Infinit & Docker 35/37"
docker ps -a
```
To launch a new container simply run the same command as before;
```bash frame="terminal" title="Playing with Infinit & Docker 36/37"
docker run -it --rm --volume-driver infinit -v russ/my-volume:/mnt alpine ash
```
and check the contents of `/mnt` by running;
```bash frame="terminal" title="Playing with Infinit & Docker 37/37"
ls -lhat /mnt
cat /mnt/docker
exit
```
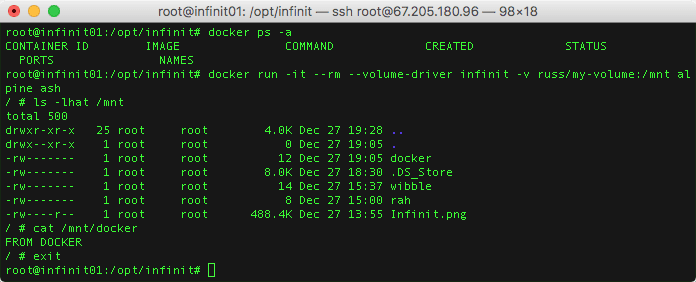 Thats about it, so far. I would say that the software itself should be considered pre-alpha and everything above is going to change at some point in the next 12 months. There is currently no support for Docker Swarm or Kubernetes or support for block storage, however it shows quite a lot of potential and as it stands 2017 is going to be an interesting year for Docker and software defined storage.
For more information on the acquisition please see the following
- [Docker Acquires Infinit: A New Data Layer For Distributed Applications](https://blog.docker.com/2016/12/docker-acquires-infinit/)
- [Docker Boosts Container Storage with Infinit Acquisition](http://www.eweek.com/virtualization/docker-boosts-container-storage-with-infinit-acquisition.html)
- [cat Infinit.tgz | docker import - Infinit:acquired](http://www.theregister.co.uk/2016/12/06/docker_swallows_infinit/)
and for the current docs see;
- [Infinit Documentation](https://infinit.sh/documentation/reference)
- [Roadmap](https://infinit.sh/documentation/roadmap) (I am guessing this going to change alot over the next few months)
- [Change Log](https://infinit.sh/documentation/changelog)
Thats about it, so far. I would say that the software itself should be considered pre-alpha and everything above is going to change at some point in the next 12 months. There is currently no support for Docker Swarm or Kubernetes or support for block storage, however it shows quite a lot of potential and as it stands 2017 is going to be an interesting year for Docker and software defined storage.
For more information on the acquisition please see the following
- [Docker Acquires Infinit: A New Data Layer For Distributed Applications](https://blog.docker.com/2016/12/docker-acquires-infinit/)
- [Docker Boosts Container Storage with Infinit Acquisition](http://www.eweek.com/virtualization/docker-boosts-container-storage-with-infinit-acquisition.html)
- [cat Infinit.tgz | docker import - Infinit:acquired](http://www.theregister.co.uk/2016/12/06/docker_swallows_infinit/)
and for the current docs see;
- [Infinit Documentation](https://infinit.sh/documentation/reference)
- [Roadmap](https://infinit.sh/documentation/roadmap) (I am guessing this going to change alot over the next few months)
- [Change Log](https://infinit.sh/documentation/changelog)